So, my company was having a volunteer appreciation event last night, and I noticed that our normal photographers (from the art department) were not present taking pictures. So, I volunteered my services. Since it was the difference between NO shots, and my shots (being completely untrained, and untried) they went with me. :-) It was pretty neat. I ended up shooting 150 shots, HOPING to get some good ones.
The problem, is that the light was BAD. I do not have a lot of experience running my camera at high ISOs, so I kept it at 400, and hoped for the best. I learned a few things. Taking pictures of people talking, I SHOULD have run it up to 1600. They just did NOT turn out well. Even with the flash (which I used EXTREMELY sparingly, to prevent distraction). When you have a presentation going on, especially something SERIOUS, people sit VERY still. THAT is the time to crank the ISO down, and take shots of the audience. I also came to LOVE live view on my camera. When shooting macro, and landscapes, I use live view a lot, but in this setting is really rocked. I was told today, that the pictures were very well done, and they were impressed with the level of focus on some subjects. So, here is my secret. I used live view, with a remote shutter release, to prevent camera shake. After live view was up, I would compose my shot. Then, I would move the focus square over the person, or area I wanted in focus, and hit the magnify button. That would REALLY magnify the subject, and I would manually focus on that person. From there, it was as simple as putting my remote shutter release in front of the camera, hitting the shutter button, and the picture was taken.
Most of my shots were with a full tripod, with the head part extended to my eye level (6'). It was pretty wobbly, so I tried to avoid touching it, as much as possible. After taking pictures for about 2/3 of the event with that, I went up stairs, and lowered the head all the way back down, to try and get some more stability. I then shot down on the audience from above. I got some good pictures there, with my wide-angle lens. Once I came back down, I started shooting with the collapsed head, so I was taking pictures from just above the audiences point of view, giving me a different, and unique perspective of the event.
So, a few things learned from this. Carry your equipment with you, ALL THE TIME. I got this opportunity, because my camera bag was in my car. (as was my tripod and monopod). When shooting in low light, crank the ISO up. Good, sharp, somewhat graining pictures trump good, blurry, pictures, that have low noise. Move your perspective around. I shot over the audience(from a balcony area), at audience level, as well as some good general shots about a head’s height higher than the seated audience. Move around. I literally shot, throughout the night, in about a 180 degrees from one side to the next, carrying my tripod with me. I wish I had shot the dinner trays, and other items, to give a better, full feeling to the event. I also wish I had asked the presenters to each walk back with me, so I could get a GOOD picture of them. Finally, I wish this had been "planned" and I could have gotten there earlier. I was one of the last ones to eat, and finished JUST before the presentation. I volunteered to shoot, while in line, waiting to get my food. It did NOT give me much time to get stuff together, and ready to shoot. Finally, I needed a better tripod. I have that now (yea me). That should help greatly, in the future.
It sounds like I did a good enough job, that the art department is looking at using me in future photo shoots, like this. That is kind of exciting.
Wednesday, June 4, 2008
Tuesday, June 3, 2008
A lucky shot : snake on a rock
I took the daughter to Kathryn Albertson Park, our favorite stop for taking pictures, and walking around. I love to go into Eyrie area, and look around. Yesterday, there were 4 turtles on rocks in the pond. As luck would have it, there was also a snake laying on the rock, by the edge of the water. I slowly snuck up on it, taking pictures, knowing it was going to bolt. Imagine my surprise, when it never did. So, I ran off, and grabbed my macro lens out of my pack, to take these shots. At first, I thought it may be dead, though, after a few more shots, I noticed that it was starting to move, and get agitated. I think what I love the MOST about this shot, is MY reflection, in the snake’s eye. That is just cool. I carry a “bean bag” computer wrist rest to put my camera on, close to the ground. I used that to hold the camera steady as I took the close-ups of the snake. I kind of wish I had taken a few with a smaller aperture, to try and get all the scales in focus. That is pretty much a minor critique on the picture, since I am very happy with it.
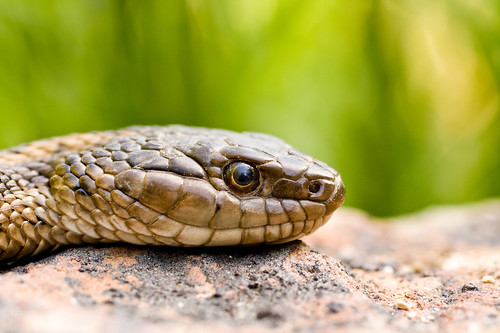
My flickr site also features another picture, with the snake's eye looking forward.
Monday, June 2, 2008
Filters
You know, there are a TON of filters out there. From what I have read, it seem that there is really, only ONE filter, that can't be duplicated in Post Processing. That is the Circular Polarizer. So, that was one of the first filters I picked up. And it does some amazing things to the sky, water, plants, and anything reflective. It makes the world POP for lack of a better word.
But, that is not where it ends, at least for me. I also have a Cokin P filter holder. The nice thing about this, is that it holds up to 3 filters at once, and allows you to use them on different sized lenses. Since my Macro is 52mm, and my other lenses are all 58mm, this is kind of important.
So, for the Cokin, I have 5 filters. The first three, graduated neutral density filters, came as a set, with the filter holder. This allows me to darken the sky, while leaving the ground bright, so I can balance light. Yea, it can be done in post, but it is usually quicker, and (at least for me) easier to get it done on camera. I also have a mid-range neutral density filter. This one, darkens the scene, so I can use a slower shutter speed. So far, I have used it on water, to give water that silky, moving quality. Finally, my last filter is another graduated filter, but instead of grey, to darken things, this one is blue, to give the sky a bit of a pop. Personally, I like a nice, dark blue sky, and in summers around here, the sky turns kind of pale. I am planning on using this filter to make it look a bit better.
My next filter that is kind of fun to play with, is an infrared filter. This allows you to shoot in the infrared spectrum, outside what our eyes can see. It creates a more surreal look to photographs. It is also a “black and white” medium. You convert the pictures from their red-tinged look, to black and white, for the best effect. This filter works REALLY well, in bright sunlight, so while most photographers are running off in the middle of the day, you can continue to fire off pictures, taking advantage of all the additional light.
My last filter, is the filter of controversy. It is the UV filter. Ultimately, for me, it doesn’t do anything. (From what I understand, if you see a “UV haze” in the air, this will help cut it down… but that is not why probably 98% of the people pick it up). Most people use it to protect their lens. A $20-40 filter, getting scratched is a LOT less painful, than a $300+ lens getting scratched. Honestly, I don’t use them much, but one time, I was looking for birds (birds in flight) and wanted to leave the lens-cap off, and have the camera ready to fire. Well, I put the UV filter on, JUST in case. Now, the negatives. These filters are going to degrade your picture. Light is going through more, coated glass. It happens. You also loose light. Depending on the person, these negatives are far worse than the positives. I tend to fit in the middle. If I am in an area, like walking in the park, I leave the filters off. The “danger” level, goes down. It is flat ground, nice paths, and the like. If I am going off the trail, or something, then I put the UV filter on.
There is my little run-down, and primer on filters. There are a lot out there. I hope to eventually pick up an enhancement filter (jeeze, THOSE are expensive) a circular polarizer for my cokin, as well as the other 2 neutral density cokin filters.

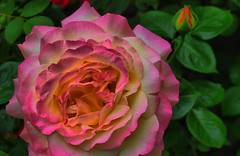
With this shot, my IR filter JUST came in, and I wanted to test it out. You can see that green comes through PRETTY well. It should be converted to Black and White to really make it look better, but this is basically just as shot, with an Infrared filter
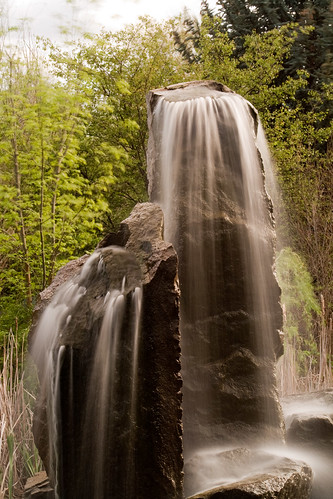
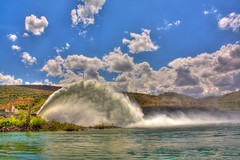
Here is a fountain in the park. I used a neutral density filter to slow the shutter speed down, so I could take a picture of the water flowing.
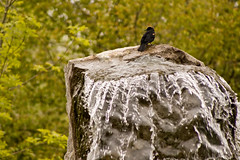
Here is that same fountain. I was taking a picture of the bird, which moves too much to work will slowed down. So, this is what the fountain looked like, without the filter to slow the shot down
But, that is not where it ends, at least for me. I also have a Cokin P filter holder. The nice thing about this, is that it holds up to 3 filters at once, and allows you to use them on different sized lenses. Since my Macro is 52mm, and my other lenses are all 58mm, this is kind of important.
So, for the Cokin, I have 5 filters. The first three, graduated neutral density filters, came as a set, with the filter holder. This allows me to darken the sky, while leaving the ground bright, so I can balance light. Yea, it can be done in post, but it is usually quicker, and (at least for me) easier to get it done on camera. I also have a mid-range neutral density filter. This one, darkens the scene, so I can use a slower shutter speed. So far, I have used it on water, to give water that silky, moving quality. Finally, my last filter is another graduated filter, but instead of grey, to darken things, this one is blue, to give the sky a bit of a pop. Personally, I like a nice, dark blue sky, and in summers around here, the sky turns kind of pale. I am planning on using this filter to make it look a bit better.
My next filter that is kind of fun to play with, is an infrared filter. This allows you to shoot in the infrared spectrum, outside what our eyes can see. It creates a more surreal look to photographs. It is also a “black and white” medium. You convert the pictures from their red-tinged look, to black and white, for the best effect. This filter works REALLY well, in bright sunlight, so while most photographers are running off in the middle of the day, you can continue to fire off pictures, taking advantage of all the additional light.
My last filter, is the filter of controversy. It is the UV filter. Ultimately, for me, it doesn’t do anything. (From what I understand, if you see a “UV haze” in the air, this will help cut it down… but that is not why probably 98% of the people pick it up). Most people use it to protect their lens. A $20-40 filter, getting scratched is a LOT less painful, than a $300+ lens getting scratched. Honestly, I don’t use them much, but one time, I was looking for birds (birds in flight) and wanted to leave the lens-cap off, and have the camera ready to fire. Well, I put the UV filter on, JUST in case. Now, the negatives. These filters are going to degrade your picture. Light is going through more, coated glass. It happens. You also loose light. Depending on the person, these negatives are far worse than the positives. I tend to fit in the middle. If I am in an area, like walking in the park, I leave the filters off. The “danger” level, goes down. It is flat ground, nice paths, and the like. If I am going off the trail, or something, then I put the UV filter on.
There is my little run-down, and primer on filters. There are a lot out there. I hope to eventually pick up an enhancement filter (jeeze, THOSE are expensive) a circular polarizer for my cokin, as well as the other 2 neutral density cokin filters.
With this shot, my IR filter JUST came in, and I wanted to test it out. You can see that green comes through PRETTY well. It should be converted to Black and White to really make it look better, but this is basically just as shot, with an Infrared filter
Here is a fountain in the park. I used a neutral density filter to slow the shutter speed down, so I could take a picture of the water flowing.
Here is that same fountain. I was taking a picture of the bird, which moves too much to work will slowed down. So, this is what the fountain looked like, without the filter to slow the shot down
Sunday, June 1, 2008
High Dynamic Range photography
Ok, I admit it. When it comes to computers, I am a GEEK. I love computers, I love twiddling with them... and I love playing with software. I think that is kind of why photography speaks to me. I am not an artist. God, I don't have an artistic bone in my body. Luckily, for me, I can at least SEE art, and the camera allows me to capture it.
If you have spent much time at all, with photography, you will know we have something called the Rule of Thirds. With the cameras themselves, we have THREE distinct settings, used to get the proper lighting: ISO, Shutter Speed, and apature. We take into account the fstop for depth of field. We use technology, to capture art. There are artists out there, that create art, then use a camera to capture it. I will freely admit, I am no where CLOSE to that... but I do like the techy aspect of photography. I have learned how to use ISO to squeeze out a bit better shot, but I realize I am giving up a "clean" image. (due to more "grain" or noise). I have figured out how to use neutral density filters to reduce the light going into my camera, so I can take a longer exposure of a water, to make it look silky. I think I have come a long ways. While I used to actively think about these things, now, it is becoming second nature to a degree. (let’s face it, I have only had my dSLR for just under 2 months, and you can only learn SO much in that time...)
So, for my NEXT geeky move, into photography. It is HDR, or High Dynamic Range imaging. This stuff is pretty cool. There are flickr groups dedicated to it. There is software designed for it (Photomatix and High dynamic Photo) and there seems to be a big buzz about it. It is very cool. While our eyes can see something like 11 "fstops" of range, a picture can pull up between 5 and 7. (I have seen both of those numbers listed). So, our eyes can see a LOT more of a scene than a camera. We can see INTO shadows, and pull out detail, while at the same time, looking over at a bright subject, and seeing detail in there. With a camera, one or both would be blown out, or underexposed, to get a picture. Well, with HDR, we take a series of pictures, and blend them into one. This creates some VERY cool effects, and makes for some very rich pictures. (Peruse the HDR flickr group I linked to above, to see just how cool).
For some reason, my geeky friends love this, as do I. It is, on its surface, very simple. I set my camera to auto-bracket. I fire 1 shot at -1 exposure, 1 at the proper exposure and then one more at +1 exposure. Then, I use one of those two softwares above, to merge it into one picture. I know it is FAR more complicated than that, since Photomatix has 2 settings, one is HDR, and one is blending. To me, they are one in the same (at this point in my journey of knowledge), but, since both are options, I know they are ultimately different.
If you are curious about the quality of the software I list, from what I understand, Photomatix is the most popular piece of software. It is supposed to be able to create the most natural looking pictures. While High Dynamic Photo creates good photos as well… its user-interface is MILES better than Photomatix’s. Ultimately, it depends on what you care more about. Oh, and Photomatix is about double the price of HDP. (as an aside, I bought Photomatix today, to start playing with this stuff, and later in the day, learned about HDP. I doubt I would have gone for Photomatix, because of the price, but if you search well with Google, you CAN find a 15% discount on Photomatix, bringing the price down some)
Now, lets look at some pictures:
This one was processed with High Dynamic Photo. I had 3 exposures of -1.33/0/+1.33.
 This one was processed with Photomatix. I had 3 exposures of -1.33/0/+1.33.

This one was processed with Photomatix. I had 3 exposures of -1.33/0/+1.33.
These are a little different. They were blended, but based on one RAW file. I set one to +1 Exposure and one to -1 exposure saved the 2 files, and then combined them. It was more to test it out. The top one, is "blended" the bottom one was combined using HDR.

Subscribe to:
Comments (Atom)