But, that is not where it ends, at least for me. I also have a Cokin P filter holder. The nice thing about this, is that it holds up to 3 filters at once, and allows you to use them on different sized lenses. Since my Macro is 52mm, and my other lenses are all 58mm, this is kind of important.
So, for the Cokin, I have 5 filters. The first three, graduated neutral density filters, came as a set, with the filter holder. This allows me to darken the sky, while leaving the ground bright, so I can balance light. Yea, it can be done in post, but it is usually quicker, and (at least for me) easier to get it done on camera. I also have a mid-range neutral density filter. This one, darkens the scene, so I can use a slower shutter speed. So far, I have used it on water, to give water that silky, moving quality. Finally, my last filter is another graduated filter, but instead of grey, to darken things, this one is blue, to give the sky a bit of a pop. Personally, I like a nice, dark blue sky, and in summers around here, the sky turns kind of pale. I am planning on using this filter to make it look a bit better.
My next filter that is kind of fun to play with, is an infrared filter. This allows you to shoot in the infrared spectrum, outside what our eyes can see. It creates a more surreal look to photographs. It is also a “black and white” medium. You convert the pictures from their red-tinged look, to black and white, for the best effect. This filter works REALLY well, in bright sunlight, so while most photographers are running off in the middle of the day, you can continue to fire off pictures, taking advantage of all the additional light.
My last filter, is the filter of controversy. It is the UV filter. Ultimately, for me, it doesn’t do anything. (From what I understand, if you see a “UV haze” in the air, this will help cut it down… but that is not why probably 98% of the people pick it up). Most people use it to protect their lens. A $20-40 filter, getting scratched is a LOT less painful, than a $300+ lens getting scratched. Honestly, I don’t use them much, but one time, I was looking for birds (birds in flight) and wanted to leave the lens-cap off, and have the camera ready to fire. Well, I put the UV filter on, JUST in case. Now, the negatives. These filters are going to degrade your picture. Light is going through more, coated glass. It happens. You also loose light. Depending on the person, these negatives are far worse than the positives. I tend to fit in the middle. If I am in an area, like walking in the park, I leave the filters off. The “danger” level, goes down. It is flat ground, nice paths, and the like. If I am going off the trail, or something, then I put the UV filter on.
There is my little run-down, and primer on filters. There are a lot out there. I hope to eventually pick up an enhancement filter (jeeze, THOSE are expensive) a circular polarizer for my cokin, as well as the other 2 neutral density cokin filters.

With this shot, my IR filter JUST came in, and I wanted to test it out. You can see that green comes through PRETTY well. It should be converted to Black and White to really make it look better, but this is basically just as shot, with an Infrared filter
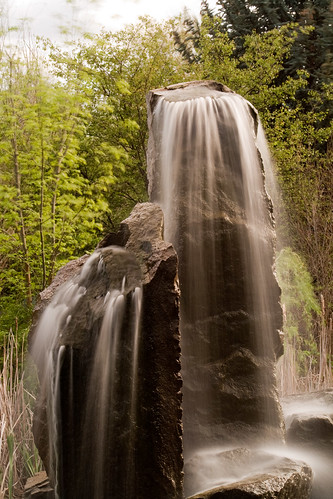
Here is a fountain in the park. I used a neutral density filter to slow the shutter speed down, so I could take a picture of the water flowing.
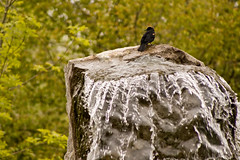
Here is that same fountain. I was taking a picture of the bird, which moves too much to work will slowed down. So, this is what the fountain looked like, without the filter to slow the shot down


No comments:
Post a Comment